
Table of Contents
- Introduction
- Creating a public bucket in AWS S3
- Setting up a bucket & CORS policy
- Creating an IAM user for managing images
- Pointing of custom domain to S3
- Setting up WP Offload Media Lite plugin
- Syncing of existing images in Amazon S3
- Setting up a budget alert in AWS S3
Introduction
Hello Folks!
A few years back, I was looking for a solution to host my WordPress blog static assets. I had only 3 requirements
- It has to be 99.99% SLA/Uptime
- It should be easy to implement
- It has to be budget-friendly.
I started searching on Google and come across several solutions, but none of them had all the above 3 requirements. So I thought of using Amazon Web Services Simple Storage Service, AWS S3 in short ;).
✅ On paper, they promise to provide 98-99.99% SLA.
✅ There are several 3rd party plugins available that can do the heavy lifting of implementations.
✅ It is too budget-friendly, and costs a pinch in a pocket.
Creating a public bucket in AWS S3
Before going into details, you need to have an active AWS account. If you do not have it already then you check this official doc as to how to do the same.
- Go to S3 home page.
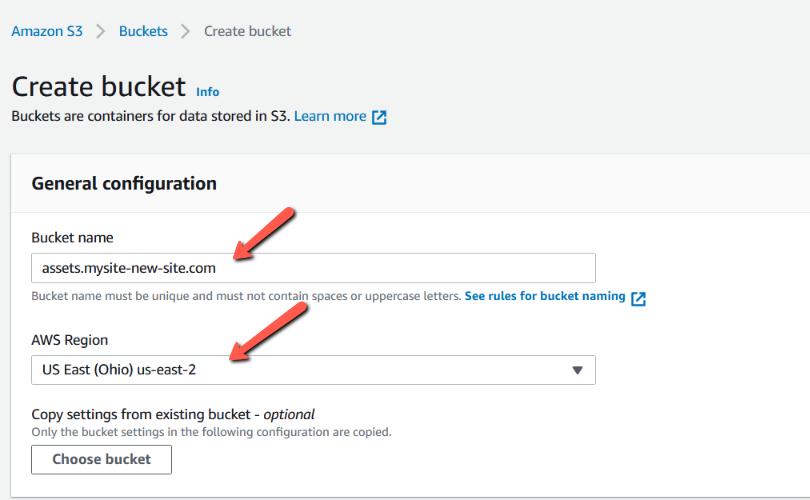
- Click on the "Create bucket" button.
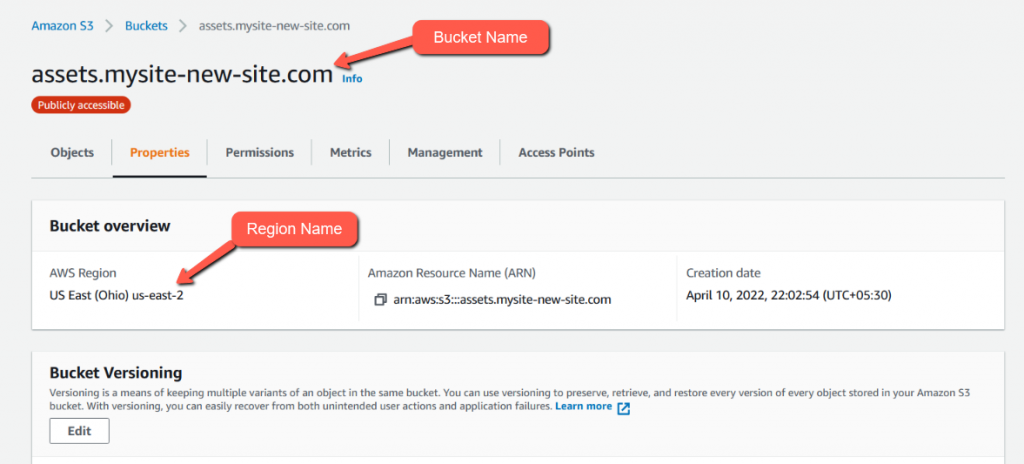
- In the "Bucket name" field chose an FQDN that you want to use for an assets URL.
- From "AWS Region" pick the region from where you are expecting more traffic. If you are not sure then you can pick any US Data-center which is cost-effective.
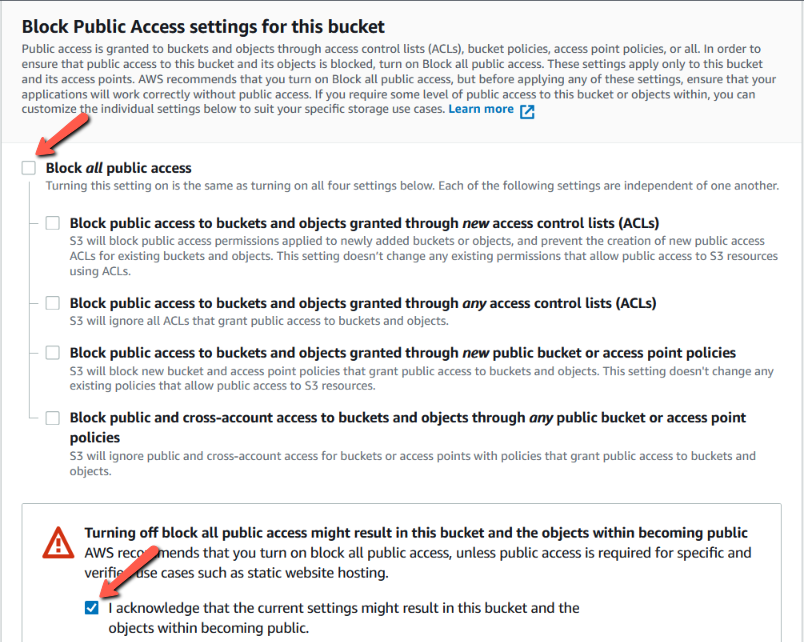
- Make the bucket public by unchecking "Block all public access".
- Click on the "Create bucket" button at the bottom.
Setting up a bucket & CORS policy
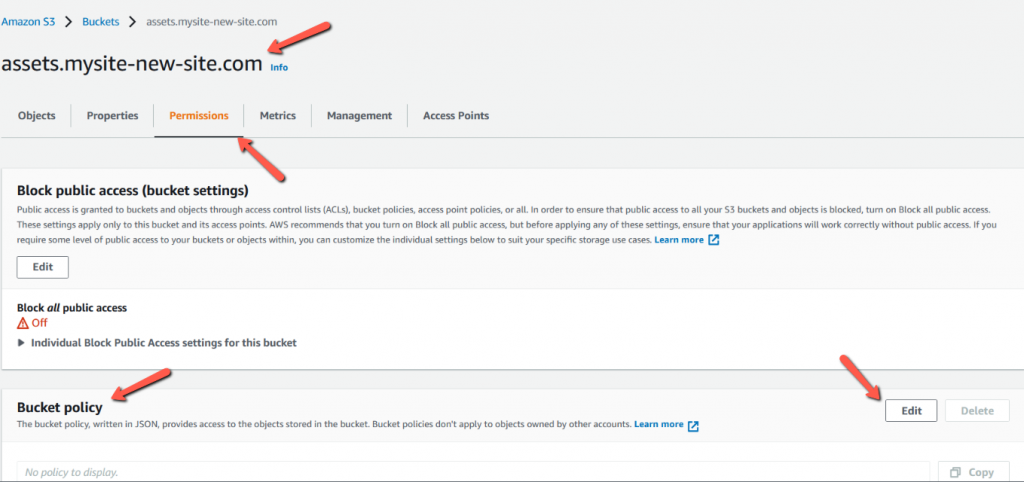
Now you have to set a bucket policy so that its objects or content can be accessed publicly. To do this, you have to navigate to the bucket "Permissions" tab and scroll to the bucket policy area and click on "Edit".
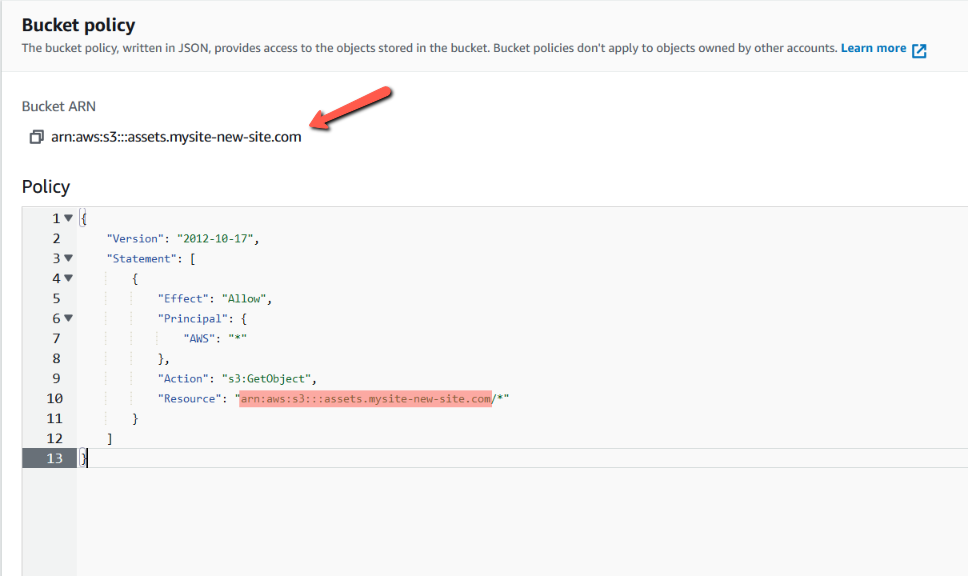
Now replace the content with the following JSON, but do not forget to replace the __ARN_AWS_NAME__ placeholder with your Bucket's ARN name.
{
    "Version": "2012-10-17",
    "Statement": [
        {
            "Effect": "Allow",
            "Principal" : { "AWS" : "*" },
            "Action": ["s3:GetObject"],
            "Resource": "__ARN_AWS_NAME__/*"
        }
    ]
}
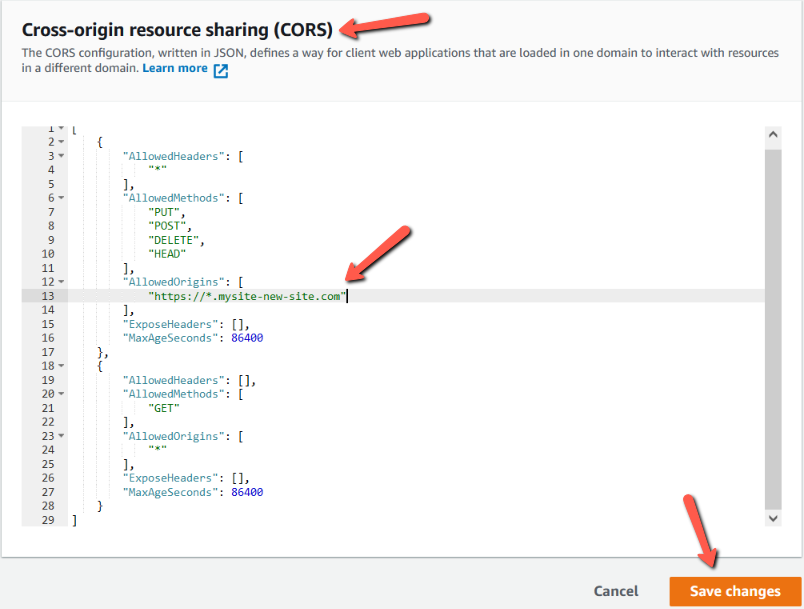
Now you have to set the Cross-origin resource sharing (CORS) policy so that no one can use your assets from any other domain(s), except the ones which are whitelisted. To do so you have to navigate to the bucket permission tab and go to CORS policy and click on edit.
Add the following JSON, just make sure to update the __MY_WEBSITE__ placeholder with your domain name
[

  {

    "AllowedHeaders": ["*"],

    "AllowedMethods": [

      "PUT",

      "POST",

      "DELETE",

      "HEAD"

    ],

    "AllowedOrigins": [

      "https://*.__MY_WEBSITE__"

    ],

    "ExposeHeaders": [],

    "MaxAgeSeconds": 86400

  },

  {

    "AllowedHeaders": [],

    "AllowedMethods": [

      "GET"

    ],

    "AllowedOrigins": ["*"],

    "ExposeHeaders": [],

    "MaxAgeSeconds": 86400

  }

]

Creating an IAM user for managing images
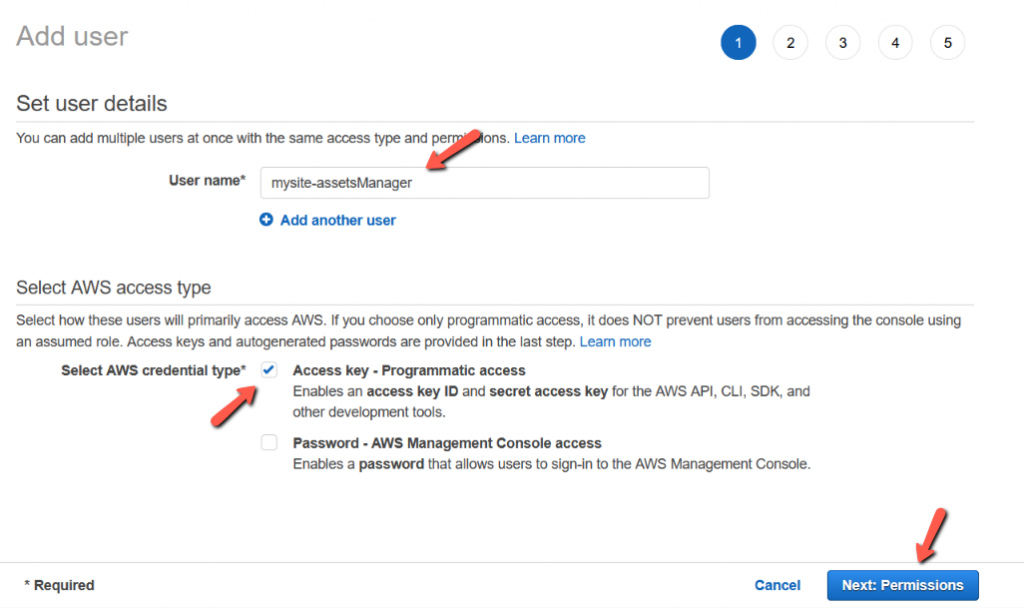
Now an API user is required which will manage your assets from WordPress via API, like uploading, deleting, etc. Go to the AWS IAM section.
- Fill in a username.
- Select an "Access key - Programmatic access" from the AWS credential type.
- Click on "Next: Permissions"
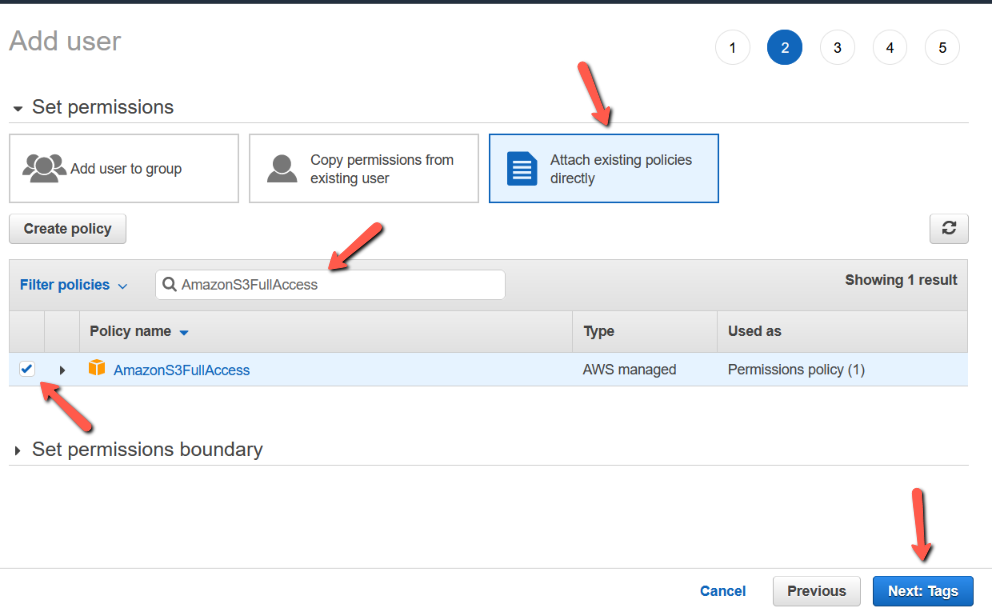
- Click the “Attach existing policies directly” button, and then enter "AmazonS3FullAccess" in the filter policies input box.
- Select the "AmazonS3FullAccess" policy.
- Click the "Next: Tags" button at the bottom of the page.
- Click on "Next: Review"
- Click on "Create user"
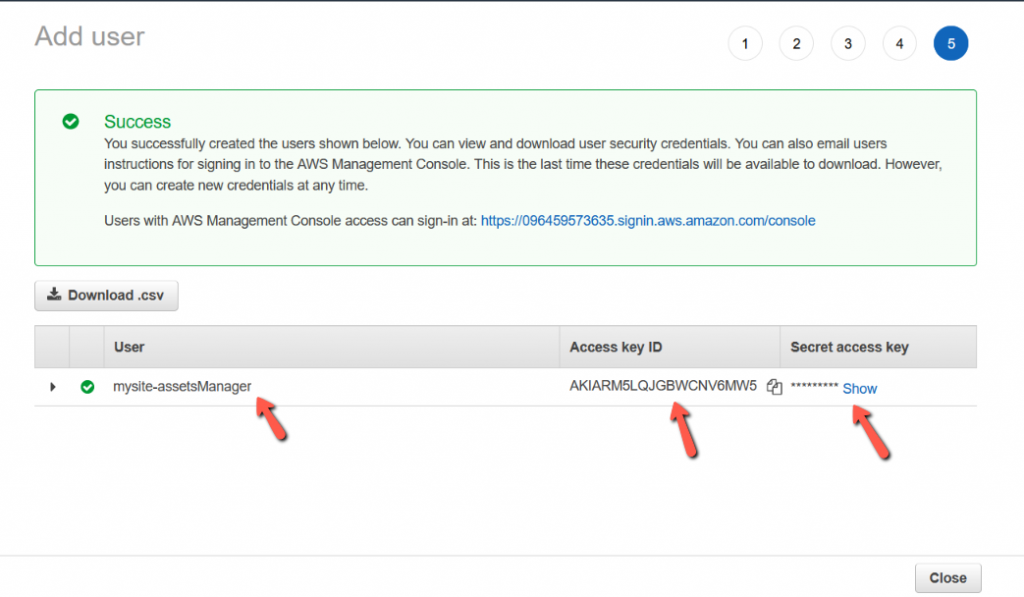
Add the credentials in wp-config.php file
define('AS3CF_SETTINGS', serialize([

    'provider'          => 'aws',

    'access-key-id'     => '*********',

    'secret-access-key' => '********************',

]));
Pointing of custom domain to S3
If you do not want to use the Amazon URL in your website, then you can use a custom domain as well to point to your bucker which in return will point to your assets.
To achieve the same you have to add a CNAME in your domain registrar like this.
; Syntax :

;
__DOMAIN_NAME__ CNAME 			__BUCKET_NAME__.s3.__UCKET_REGION__.amazonaws.com.
;

; Example:

;
assets.mysite-new-site.com CNAME 			assets.mysite-new-site.com.s3.us-east-2.amazonaws.com.
Setting up WP Offload Media Lite plugin
Install and activate WP Offload Media Lite for Amazon S3, DigitalOcean Spaces, and Google Cloud Storage plugin from wordpress.org.
The setup is very much straightforward.
- As you have already defined the credentials in
wp-config.phpin the previous step so the provider will get auto-selected. - Fill the bucket name
- Enable copy file to the bucket
- Provide the assets path as "
wp-content/uploads/" - Enable "Year/Month" if your images are organized in year and month format
- Select the delivery provider
- Provide the custom domain name
- Enable Force HTTPS
That's it!
Syncing of existing images in Amazon S3
If your site is new or you do not have any existing post images then you can skip this step. But if you have existing images then if you see those images you will see they are getting served from your server not from the S3 bucket the reason is as you are using the free version of the plugin so the syncing of old images is not enabled for that you have to use the paid version. But no worries, I have a ninja hack for that. You have to follow these steps
- Upload your whole "
wp-content/uploads/" folder into the Amazon S3 bucket which you had created. - Run the following function
wh_syncWPMediaLiteTabletill you see a message like this: "All the images are synced into WP Offload Media Lite table.". You can create a custom template and call it over and over again or set up a WordPress CORN as described in this article to achieve the same.
<?php
if (!function_exists('wh_syncWPMediaLiteTable')) {
    function wh_syncWPMediaLiteTable() {
        global $wpdb;
        $wpUploadDir = rtrim(wp_get_upload_dir()['basedir'], '/');

        $itemsTable = 'as3cf_items';
        $offloadSettings = get_option('tantan_wordpress_s3');

        $lastAttachmentID = get_option('_site_transient_wh_last_sync_attachment', 0);

        //print_r($offloadSettings);
        $objectPrefix = rtrim($offloadSettings['object-prefix'], '/');
        $format = [

            'provider' => '%s',

            'region' => '%s',

            'bucket' => '%s',

            'path' => '%s',

            'original_path' => '%s',

            'is_private' => '%d',

            'source_type' => '%s',

            'source_id' => '%d',

            'source_path' => '%s',

            'original_source_path' => '%s',

            'extra_info' => '%s',

            'originator' => '%d',

            'is_verified' => '%d'

        ];

        ksort($format);

        $format = array_values($format);
        #Getting the list of attachments

        $sql = $wpdb->prepare("SELECT p.`ID`,

                                MAX(CASE WHEN pm.meta_key = '_wp_attached_file' THEN pm.meta_value END ) as 'attached_file',

                                MAX(CASE WHEN pm.meta_key = '_wp_attachment_metadata' THEN pm.meta_value END ) as 'attachment_metadata',

                                ai.`source_id`

                                FROM `{$wpdb->prefix}posts` AS p

                                LEFT JOIN `{$wpdb->prefix}postmeta` AS pm ON p.`ID` = pm.`post_id`

                                LEFT JOIN `{$wpdb->prefix}{$itemsTable}` AS ai ON p.`ID` = ai.`source_id`

                                AND ai.`source_id` IS NULL

                                WHERE p.`post_type` = %s

                                AND p.`ID` > %d

                                GROUP BY p.`ID`

                                LIMIT %d", 'attachment', $lastAttachmentID, 10);
        $attachments = $wpdb->get_results($sql);
        if (empty($attachments)) {

            #trigger a mail to site admin that no attachments are left

            die('All the images are synced into WP Offload Media Lite table.');

            //return false;

        }

//        print_r($attachments);
        foreach ($attachments as $key => $attachment) {

            $lastAttachmentID = $attachment->ID;

            $attachmentMetadata = maybe_unserialize($attachment->attachment_metadata);
            $fullFilePath = $wpUploadDir . '/' . $attachmentMetadata['file'];
            #Checking image exists or not if not then no point of adding it into WP Offload Media's table

            if (!file_exists($fullFilePath)) {

                continue;

            }

            print_r($attachmentMetadata);
            #preparing data

            $data = [

                'provider' => 'aws',

                'region' => $offloadSettings['region'],

                'bucket' => $offloadSettings['bucket'],

                'path' => $objectPrefix . '/' . $attachment->attached_file,

                'original_path' => $objectPrefix . '/' . $attachment->attached_file,

                'is_private' => 0,

                'source_type' => 'media-library',

                'source_id' => $attachment->ID,

                'source_path' => $attachment->attached_file,

                'original_source_path' => $attachment->attached_file,

                'extra_info' => 'a:2:{s:13:"private_sizes";a:0:{}s:14:"private_prefix";s:0:"";}',

                'originator' => 0,

                'is_verified' => 1

            ];

            ksort($data);

            #Adding record into WP Offload Media's table

            $wpdb->insert("{$wpdb->prefix}{$itemsTable}", $data, $format);

        }

        update_option('_site_transient_wh_last_sync_attachment', $lastAttachmentID, false);

    }

}
Setting up a budget alert in AWS S3
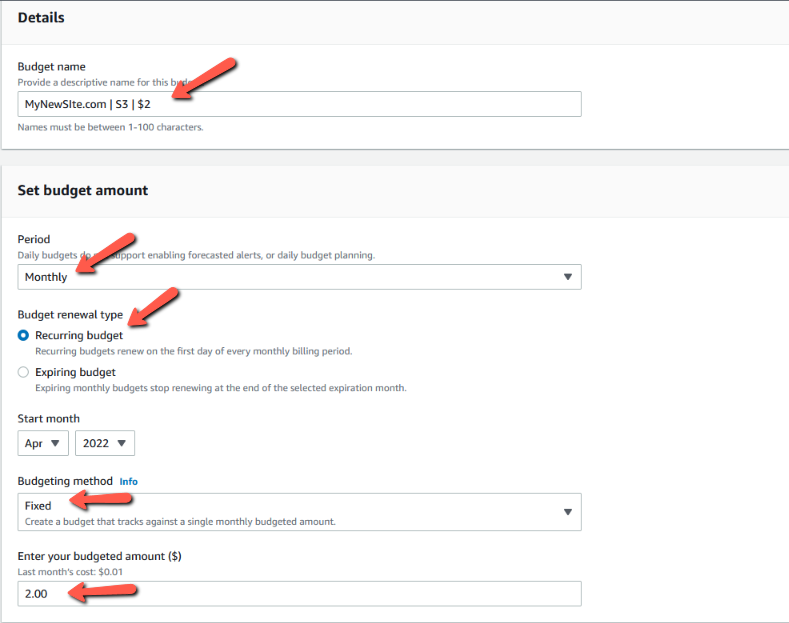
It is always recommended to set up an alert on your cloud service usage, you never know when you have a spike in your traffic and your card was charged for it. You should always keep a track of usage like it is from real traffic or a bot or something. As I am using the S3 to only serve the blog post images I have set the budget to $2. Till now I have been into the AWS free tier limit so technically I have been using it for free.
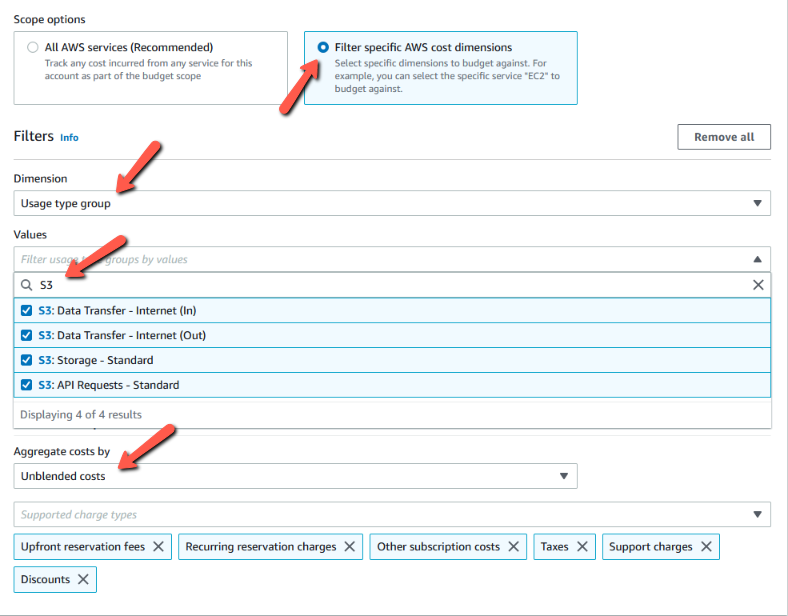
Create a recurring monthly budget of type "Cost budget" by giving it a meaningful name, price & selecting the S3 filter. In the next step set the desired threshold and the email where you want to get the alert.
That's it! If you want to read more on budgeting alert you can read this AWS official article.

Now you can sit back and relax and see how your website is performing on site-speed matrices as you have reduced the number of server requests. On top of that, you have also implemented AWS S3 bucket CDN.
One can say the AWS S3 bucket cannot be termed as fully CDN as the data are getting served from a specific location. That is partially true but you know Amazon has a default caching mechanism that caches the resource to the nearest data center from where the request was made.
Let me know in the comments if you face any issues while implementing it will be more than happy to help you. Also, let me know how much you are saving after the implementation.


I was able to find good advice from your articles.
Ha ha, that’s a proper clever hack you figured out there, mate! ‘Ow did you come to know about this? Did you ‘ave a premium access or somethin’?